Philips (Quick Setup)
Refer to your integrator or distributor to ensure the panel has the latest version of firmware to avoid any issues
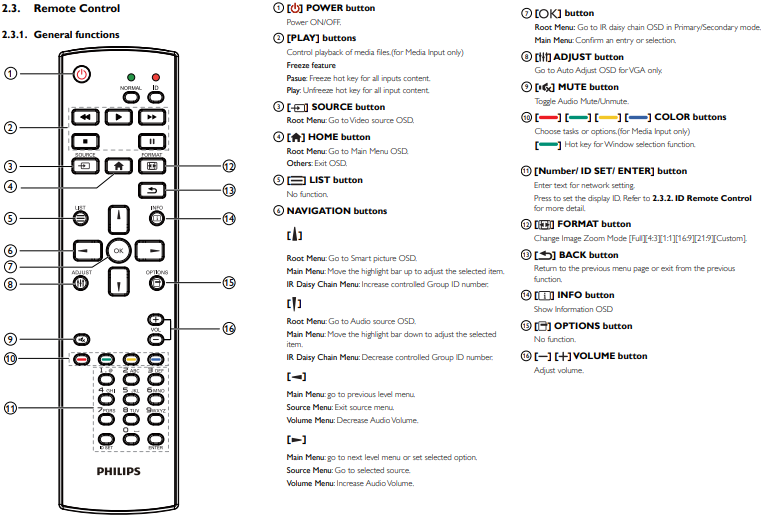
Philips Remote
Initial Screen Setup
- Connect the screen to power
- Welcome
- Select language with Up and Down arrows
- Once selected, Right Arrow, Click Start
- Network Settings (this can be skipped and completed later)
- Select either Wifi or Ethernet depending on your requirements
- Wifi
- Right Arrow to Next
- Select WiFi Access Point
- Type in Password (press Return button to remove keyboard)
- Select Next
- Right Arrow to Next
- Signage Display Settings
- Navigate to Skip
- Setup Complete
- Click Finish
Prepare USB with latest Fusion Signage APK
- Download the latest APK: https://fus.app/a.apk
Do not extract the APK file, but ensure you copy the single file to your USB drive.
- Copy the APK to the root directory of the USB Drive
- Insert USB drive into the Philips screen
Android Admin Settings
Installing the Fusion Signage application
- Press Home, 1888, Return (within 2 seconds)
- Select Apps
- Select File Manager
- Select MNT
- Select Open
- Select USB Storage
- Select Open
- Browse to the APK and select fusion-signage.apk and follow the wizard
- Select Done to close the installer
- Press Return to get back to the main menu
Assign Fusion Signage App to the “Custom” Input Source
- Press Home, 1888, Return (if not already in the Android settings)
- Select Settings
- Under the header Device, select Signage Display
- Under the header Source Settings, select Custom App
- Click Select App
- Select your installed app “Fusion Signage”
- Click Save
- Exit
Set Date & Time (Required if Using Scheduling Feature in Advanced/Pro Licences)
- Press Home, 1888, Return
- Select Settings
- Under System header, select Date & Time
- Select Time zone and update
If you are using a BDL4150D there is an additional time & date setting on the panel configuration that needs to be enabled. See the settings below: Using your remote press
Home -> Advanced Option -> Date & Time -> Set Auto Sync = Yes
Set Font Size
- Press Home, 1888, Return
- Select Settings
- Under Display
- Set the font size to Normal
Confirm Setup
- On your remote, select Source Selection, and select "Custom"
- Fusion Signage will run
- If this is the first time you’re installing this screen, you’ll see the identifier required when adding a screen in the web GUI
If there is no identifier or it says Null, check your internet settings and try again.
Confirm Aspect Ratio
- Ensure Format setting is set to “Full” on your remote
Add the Screen to the Fusion Signage portal
- Log into your customers Fusion Signage portal and navigate to the Deploy -> Add Screen button
- With Fusion Signage running on the screen, and while it is connected to the internet, enter the 6 digit identifier into the Add Screen section, give it a name, and select the licence to assign it to the account.
Philips Panel Configuration
Set Screen to Automatically Run Fusion Signage When Turned On
- Home -> Configuration1 -> Boot on source -> Action
- Set Input = Custom
Set Screen to Automatically Turn on After an Unplanned Power Outage.
Home -> Configuration1 -> Switch on state = Force On
Set Screen to correct orientation
Home -> Configuration2 -> Rotate (may be on second page) -> set to Auto Rotate “On”
Set Schedule on Screen to Turn On And Off Automatically
Home -> Advanced Option -> Schedule -> Action
Tiling Multiple Screens in a Video Wall Configuration
- Connect other screens using DVI-D daisy chain as per user manual
Home-> Advanced Option -> Tiling -> Action
- Configure all screens accordingly as per user manual.
Set power mode on screen
Home -> Advanced option -> Power Save = Mode 3 or Mode 4
V2 doesn't work
If the latest version of our application isn't supported by your device, you can download the most recent version of our previous release (v1.0.22) here: V1.0.22 APK
This should only be used if you are experiencing issues with the latest version as v1.0.22 doesn't have the latest support for Designs, Templates, Websites and video/image playback.