Philips (Quick Setup)
Refer to your integrator or distributor to ensure the panel has the latest version of firmware to avoid any issues
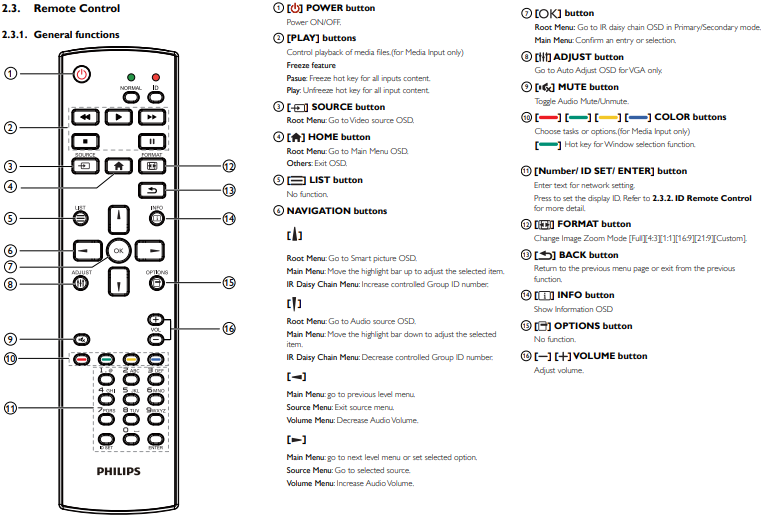
Philips Remote

Initial Screen Setup
- Connect the screen to power
- Welcome
- Select language with Up and Down arrows
- Once selected, Right Arrow, Click Start
- Network Settings (this can be skipped and completed later)
- Select either Wifi or Ethernet depending on your requirements
- Wifi
- Right Arrow to Next
- Select WiFi Access Point
- Type in Password (press Return button to remove keyboard)
- Select Next
- Right Arrow to Next
- Signage Display Settings
- Navigate to Skip
- Setup Complete
- Click Finish
Prepare USB with latest Fusion Signage APK
- Download the latest APK: https://fus.app/a.apk
Do not extract the APK file, but ensure you copy the single file to your USB drive.
- Copy the APK to the root directory of the USB Drive
- Insert USB drive into the Philips screen
BDL4050D screens are now legacy and don't support our newest app version. You will need to use app version 2.3.8 to run the app on these screens. Download version 2.3.8 here - https://assets.fusionsignage.com.au/releases/android/2.3.8/fusion-app-release-v2.3.8.apk
Android Admin Settings
Installing the Fusion Signage application
- Press Home, 1, 8, 8, 8
- Select Apps
- Select File Manager
- Select MNT
- Select Open
- Select USB Storage
- Select Open
- Browse to the APK and select fusion-signage.apk and follow the wizard
- Select Done to close the installer
- Press Return to get back to the main menu
Assign Fusion Signage App to the “Custom” Input Source
- Press Home, 1,8 ,8 ,8 (if not already in the Android settings)
- Select Settings
- Under the header Device, select Signage Display
- Under the header Source Settings, select Custom App
- Click Select App
- Select your installed app “Fusion Signage”
- Click Save
- Exit
Set Date & Time (Required if Using Scheduling Feature in Advanced/Pro Licences)
- Press Home, 1, 8, 8, 8
- Select Settings
- Under System header, select Date & Time
- Select Time zone and update
If you are using a BDL4150D there is an additional time & date setting on the panel configuration that needs to be enabled. See the settings below: Using your remote press
Home -> Advanced Option -> Date & Time -> Set Auto Sync = Yes
Set Font Size
- Press Home, 1, 8, 8, 8
- Select Settings
- Under Display
- Set the font size to Normal
Confirm Setup
- On your remote, select Source Selection, and select "Custom"
- Fusion Signage will run
- If this is the first time you’re installing this screen, you’ll see the identifier required when adding a screen in the web GUI
If there is no identifier or it says Null, check your internet settings and try again.
Confirm Aspect Ratio
- Ensure Format setting is set to “Full” on your remote
Add the Screen to the Fusion Signage portal
- Log into your customers Fusion Signage portal and navigate to the Deploy -> Add Screen button
- With Fusion Signage running on the screen, and while it is connected to the internet, enter the 6 digit identifier into the Add Screen section, give it a name, and select the licence to assign it to the account.
Philips Panel Configuration
Set Screen to Automatically Run Fusion Signage When Turned On
- Home -> Configuration1 -> Boot on source -> Action
- Set Input = Custom
Set Screen to Automatically Turn on After an Unplanned Power Outage.
Home -> Configuration1 -> Switch on state = Force On
Set Screen to correct orientation
Home -> Configuration2 -> Rotate (may be on second page) -> set to Auto Rotate “On”
Set Schedule on Screen to Turn On And Off Automatically
Home -> Advanced Option -> Schedule -> Action
Tiling Multiple Screens in a Video Wall Configuration
- Connect other screens using DVI-D daisy chain as per user manual
Home-> Advanced Option -> Tiling -> Action
- Configure all screens accordingly as per user manual.
Set power mode on screen
Home -> Advanced option -> Power Save = Mode 3 or Mode 4
V2 doesn't work
If the latest version of our application isn't supported by your device, you can download the most recent version of our previous release (v1.0.22) here: V1.0.22 APK
This should only be used if you are experiencing issues with the latest version as v1.0.22 doesn't have the latest support for Designs, Templates, Websites and video/image playback.