Fusion PWA on multi-output windows media player
If you have a Windows media player with multiple outputs and it doesn’t support a single virtual desktop, you can run multiple instances of Fusion Signage within Chrome Kiosk mode using this setup process. Using Chrome and their user profiles, we can run multiple instances of the Chrome browser with different caches, allowing different content to display on each screen.
Pre-requisites:
- Windows device with Chrome installed
- One Fusion Signage licence per screen
Download Chrome
We will be running the Fusion Signage PWA in a Chrome Browser in Kiosk mode which will run only our https://player.fusionsignage.com.au application in full screen.
- Download Chrome to the device
- Once installed, locate the Chrome installation directory, depending on your device this will likely be either:
- C:\Program Files\Google\Chrome\Application\chrome.exe
- C:\Program Files (x86)\Google\Chrome\Application\chrome.exe
- If you can’t locate this folder, find the Chrome shortcut on your desktop or start menu, right click and select “Open file location”
- If this takes you to another shortcut, right click on that shortcut and click “Open file location” until you can see a folder with Chrome.exe in it
- Note your file path for the next step
Determine your screen orientation and setup monitors
This is going to be the most challenging step as it will vary depending on your device setup.
Set up all monitors
Plug in all monitors you are going to be using for this setup. This is not strictly required, however it will make testing the solution a lot easier.
Set your screen orientation and resolution
Set your screen orientation to Landscape or Portrait. This can be done under the Windows Display Settings.
Determine your screen resolution
Under Display settings, determine the resolution of your screens. This will be important for configuring the offset of your Chrome kiosks.
We recommend using 1080P resolution (Landscape 1920 x 1080, Portrait 1080 x 1920) as running in 4K may cause playback issues depending on your device performance.
Calculate your screen offset positions
Each Chrome Kiosk needs to be configured to open on each different monitor. Kiosk mode takes the browser and runs it full screen on the URL entered into the command line. This means without the offset, the browser windows will open on top of each other and not on each window.
When the browser launches, it takes the top left (0,0) of the browser window and uses that monitor to run full screen in. If you move a browser or any application around your main monitor, then hit the maximise button, it will snap to that screen and fill the screen. If you were to move that to a secondary monitor and do the same, it will snap to that window.
We need to move the browser using the --window--position command to the correct display to allow the browser to open correctly.
How to find the offset
Identify which monitor in your set up is your Main monitor. This will be noted under Display Settings in Windows
Determine the relative positions of your other screens and their resolutions
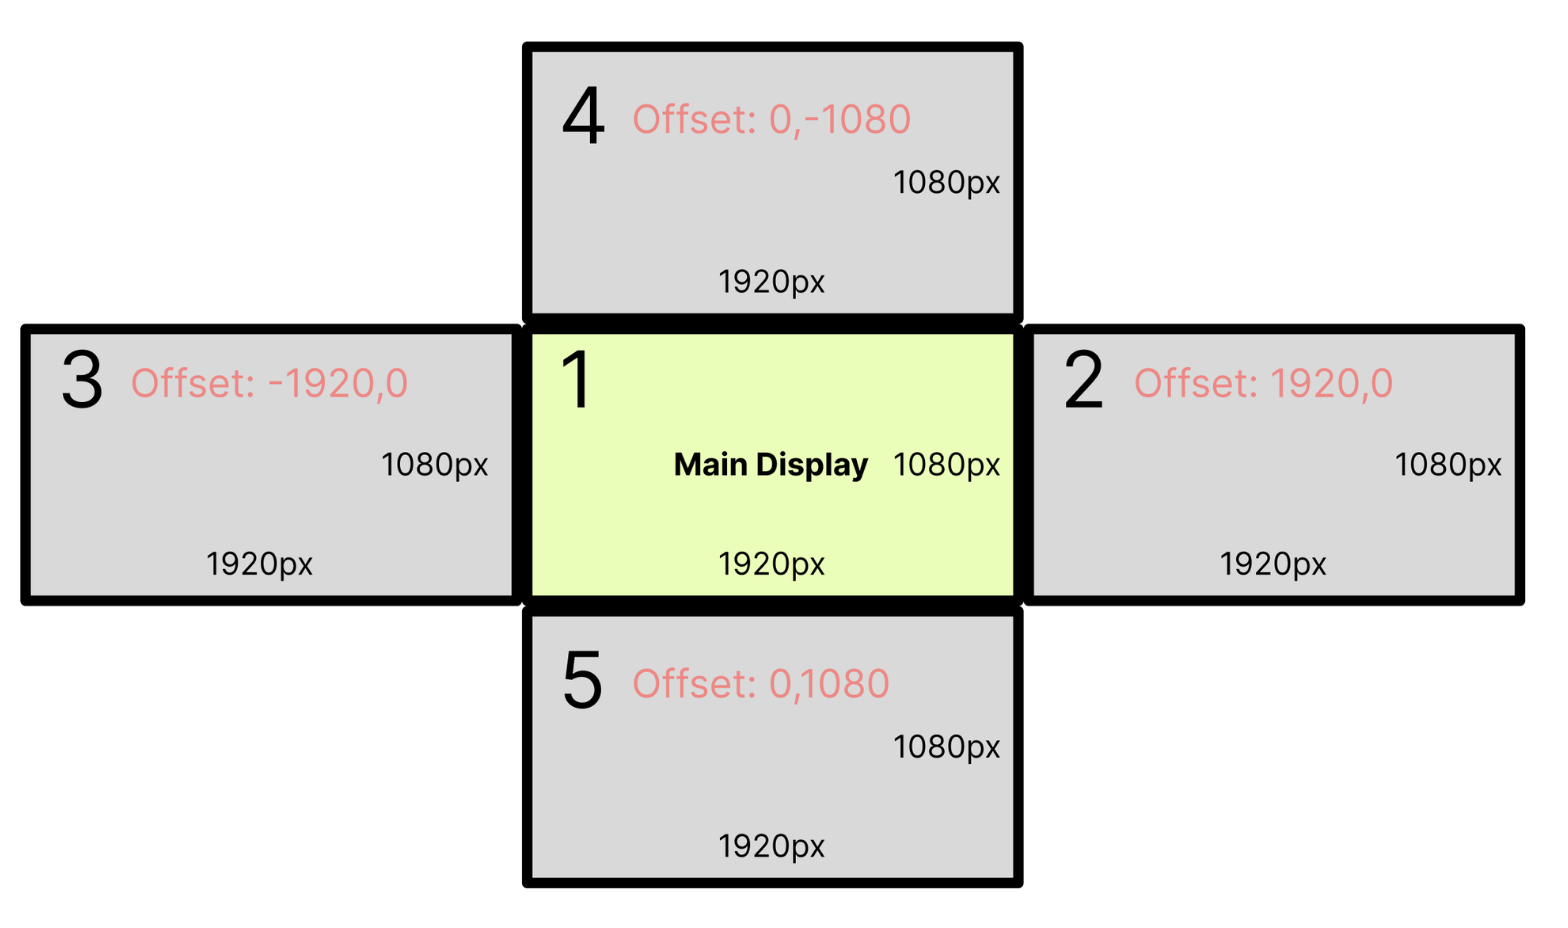
From position 0,0 in the top left of your Main Display,
Screen 2 is 1920px to the right (so 1920,0)
Screen 3 is 1920px to the left (so -1920,0 note the minus sign)
Screen 4 is 1080px to the top (so 0,-1080 note the minus sign)
Screen 5 is 1080px to the bottom (so 0,1080)
Other Configurations
Adding a few pixels to the offset
Once you have determined the pixel perfect offset, you can add a few pixels just to make sure the screen appears in the correct place.
I.e. 1920,0 could be 2000,0
Configure Chrome shortcut
The Chrome kiosk mode shortcut we use is made up of a number of components:
"C:\Program Files\Google\Chrome\Application\chrome.exe" --app=https://player.fusionsignage.com.au/ --window-position=0,0 --kiosk --user-data-dir=c:/screen1
Program Location: "C:\Program Files\Google\Chrome\Application\chrome.exe"
Change this to the URL of your Chrome application
Application URL: --app=https://player.fusionsignage.com.au/
Do not change this
Window Offset: --window-position=0,0
Update this position based on your screen positions for each shortcut you create. Add some additional pixels for each just to be sure.
Set Kiosk Mode (to run full screen): --kiosk
Do not change this
Specify user for Chrome caching: --user-data-dir=c:/screen1
Change this folder directory for each shortcut you create. This is where the content will be stored on the device.
Prepare your Chrome commands for each screen:
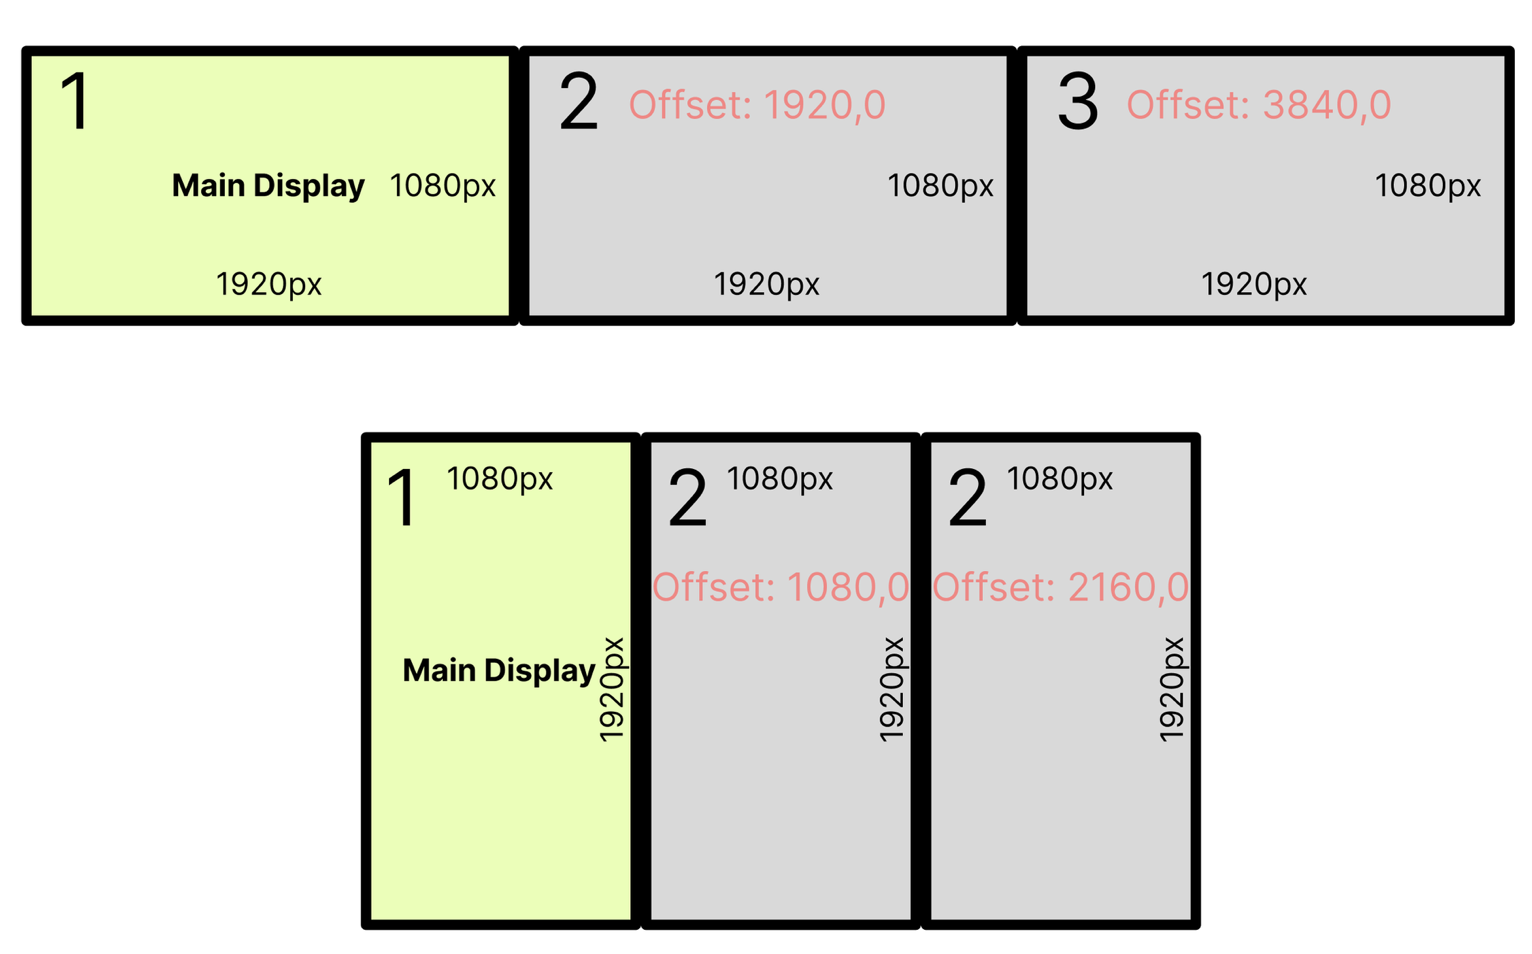
Example for 3 landscape screens to the right of the main screen:
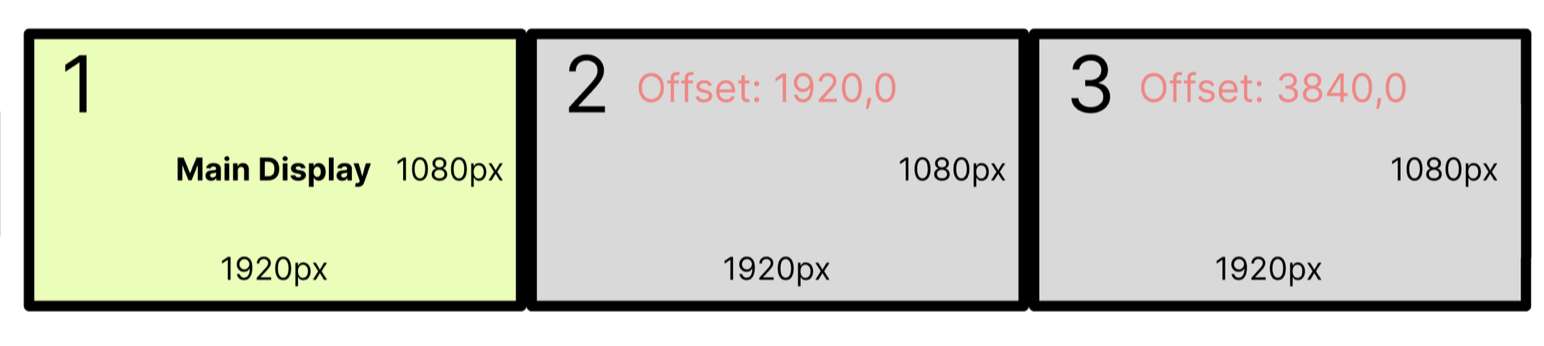
- "C:\Program Files\Google\Chrome\Application\chrome.exe" --app=https://player.fusionsignage.com.au/ --window-position=0,0 --kiosk --user-data-dir=c:/screen1
- "C:\Program Files\Google\Chrome\Application\chrome.exe" --app=https://player.fusionsignage.com.au/ --window-position=2000,0 --kiosk --user-data-dir=c:/screen2
- "C:\Program Files\Google\Chrome\Application\chrome.exe" --app=https://player.fusionsignage.com.au/ --window-position=4000,0 --kiosk --user-data-dir=c:/screen3
Remember to add some extra pixels to the offset as adding the exact pixel may cause it to appear on the wrong screen
Create Chrome shortcuts in your startup folder:
In order to get all Chrome Kiosk browsers running at the same time you’ll need to add a shortcut for each to your startup folder.
Start → Run-> shell:startup → Enter
This will open the startup folder for your computer
Right click anywhere in the folder → New → Shortcut
Enter the command line for your first screen i.e. "C:\Program Files\Google\Chrome\Application\chrome.exe" --app=https://player.fusionsignage.com.au/ --window-position=0,0 --kiosk --user-data-dir=c:/screen1
Next, then give it a name (could be screen name or position)
Repeat for each subsequent screen and update the window position and user data
You should see a shortcut for each of your screens
Reboot your device, and your Chrome kiosks should load on the correct screens