Tableau
Overview
Like the Power BI integration, The Fusion Signage Tableau integration allows you to seamlessly display Tableau projects on your digital signage screens. This enables businesses to share real-time data, dashboards, and insights with employees, customers, or stakeholders directly through their digital displays.
With this integration, you can:
✅ Showcase live Tableau projects on your screens
✅ Showcase real-time data for up-to-date insights
✅ Schedule and tag projects for targeted display times
✅ Easily manage your projects within Fusion Signage like any other media item - simply add them to playlists and send them to your screens seamlessly
Watch our Demo
Pre-requisites
- Fusion Signage PRO Licence
- Application Version Minimums
- Android 2.6.2
- Tizen 2.4.1
- WebOS 2.3.5
- Brightsign 2.4.0
- Windows 2.4.0
Publishing a Tableau project to an app version below this will result in the file being ignored as it cannot render the file.
Important to Note
- Only one connection can be made between Fusion Signage and Tableau. Therefore, only the projects that the user who established the connection can access will be available within Fusion Signage.
- Once the connection is made, all users within the Fusion Signage account will then have access to the projects of the user that made the connection.
Getting Set-Up
Step 1: Create a Connected App for Fusion Signage
- Log in to your Tableau account.
- Navigate to Settings in the main menu
- Click on the Connected Apps tab and click New Connected App
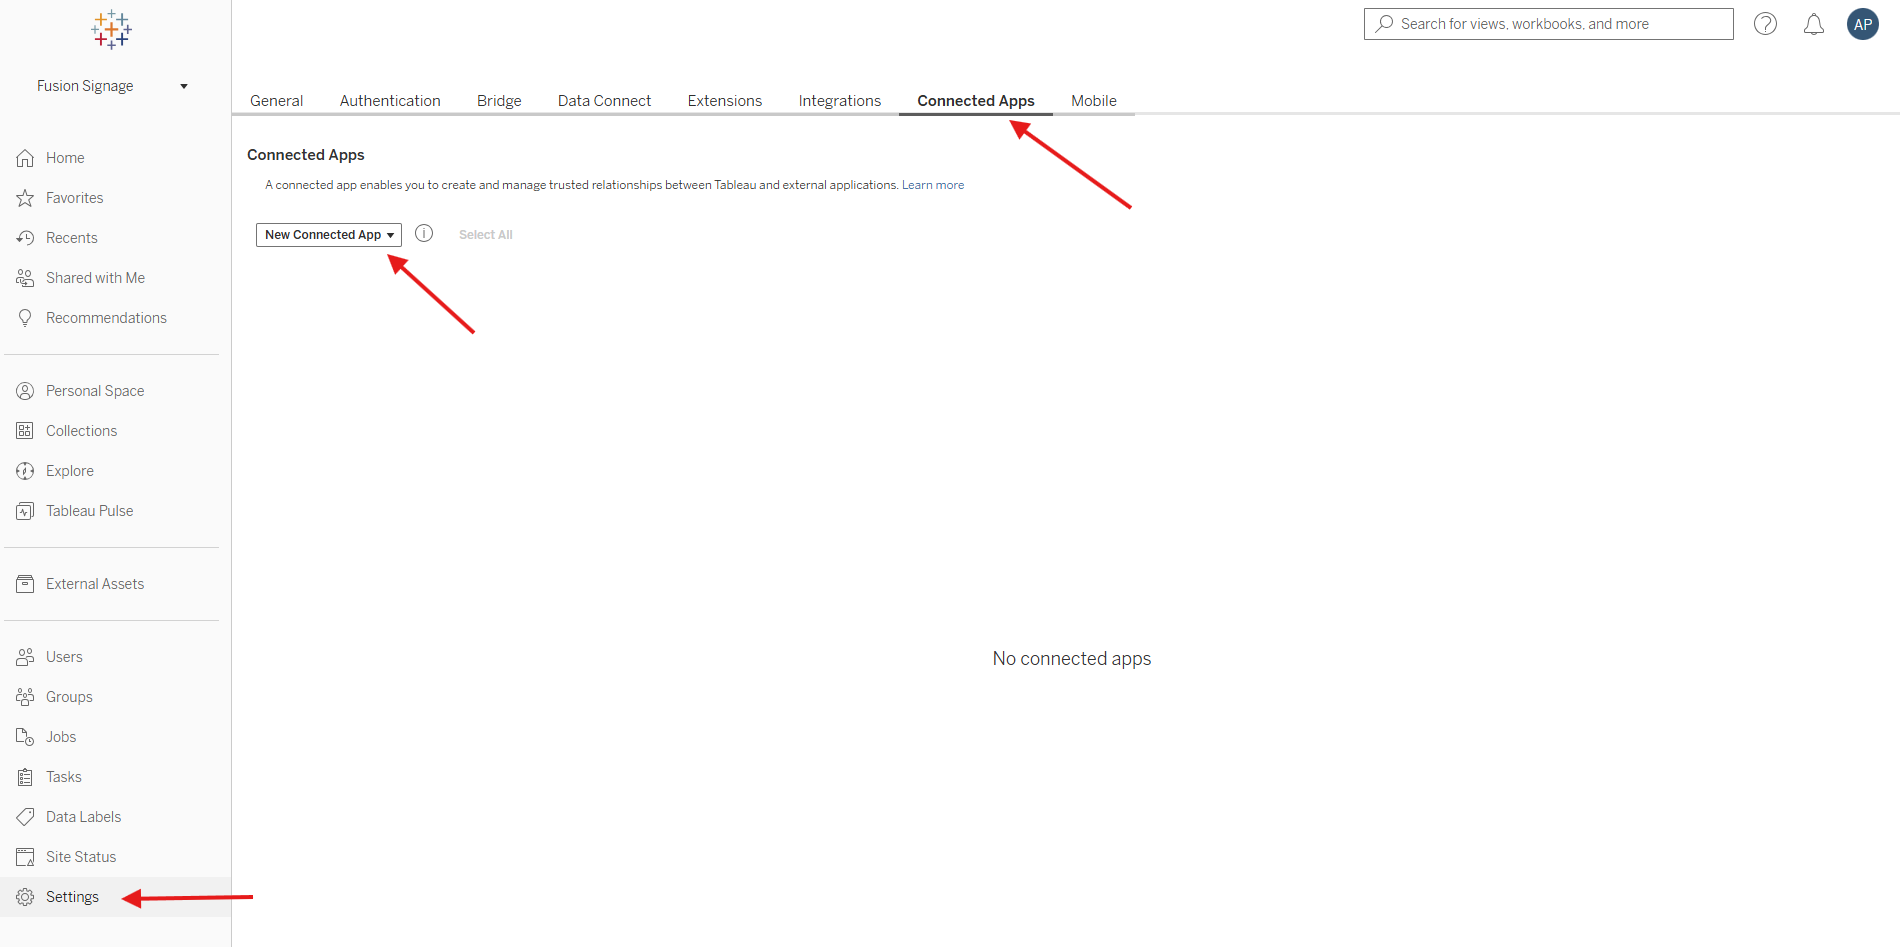
- Then select Direct Trust

- Name the App (i.e. Fusion Signage)
- Select Access level. This could be:
- All projects: Fusion Signage will have access to all worksheets linked to your Tableau account
- Only one project: Fusion Signage will have access to one specific worksheet. Select the project in the drop-down list.
- Multiple projects: Fusion Signage will access select worksheets. Select the projects in the drop-down list.
- Either allow specific domains or all domains.
- 'all domains' enables unrestricted access to embedded content.
- ‘Specific domains’ gives you the ability to scope down access to embedded content. See this Tableau article for domain formatting.
- Then click Create
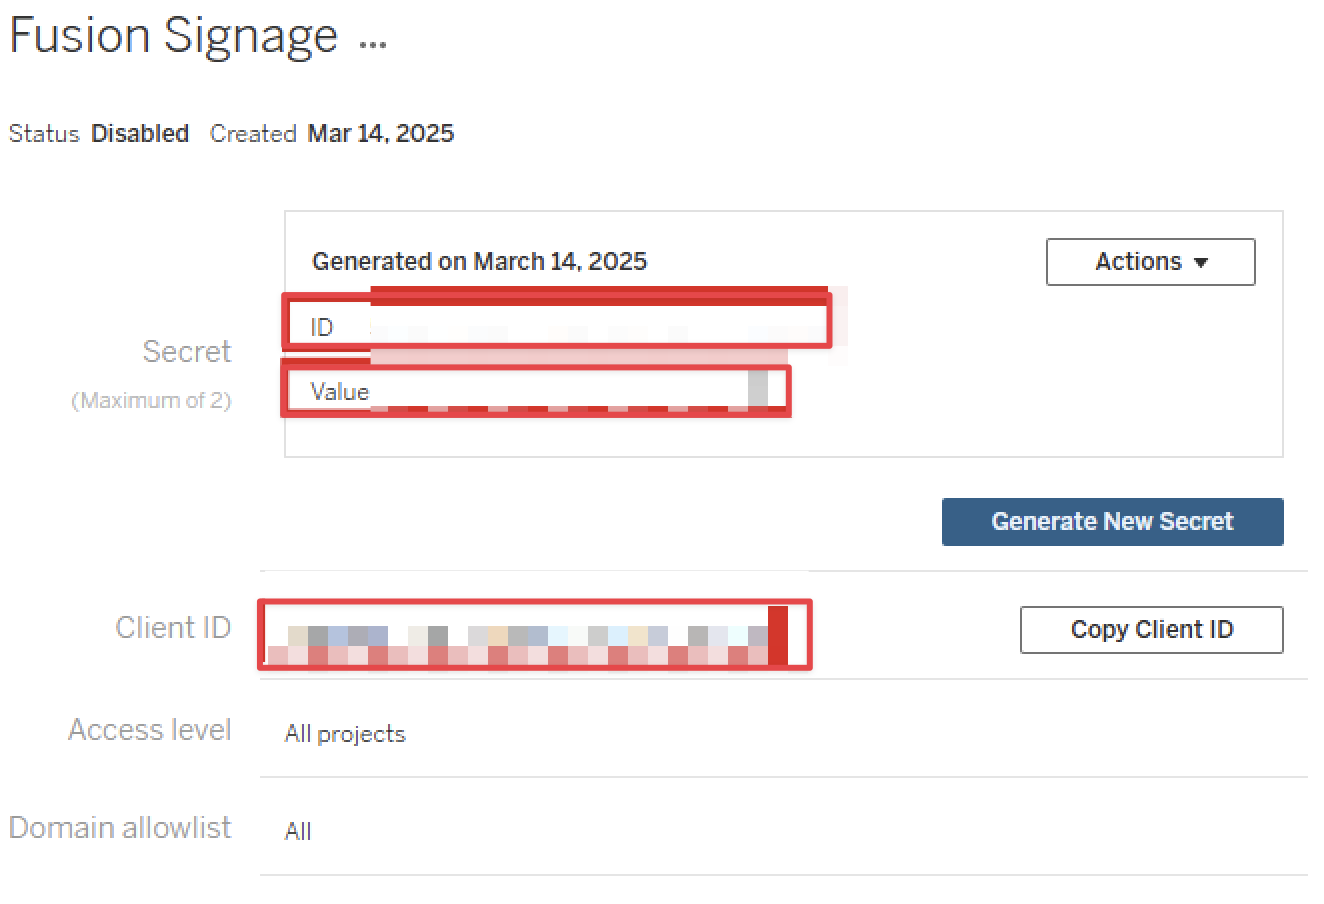
- Click Generate New Secret
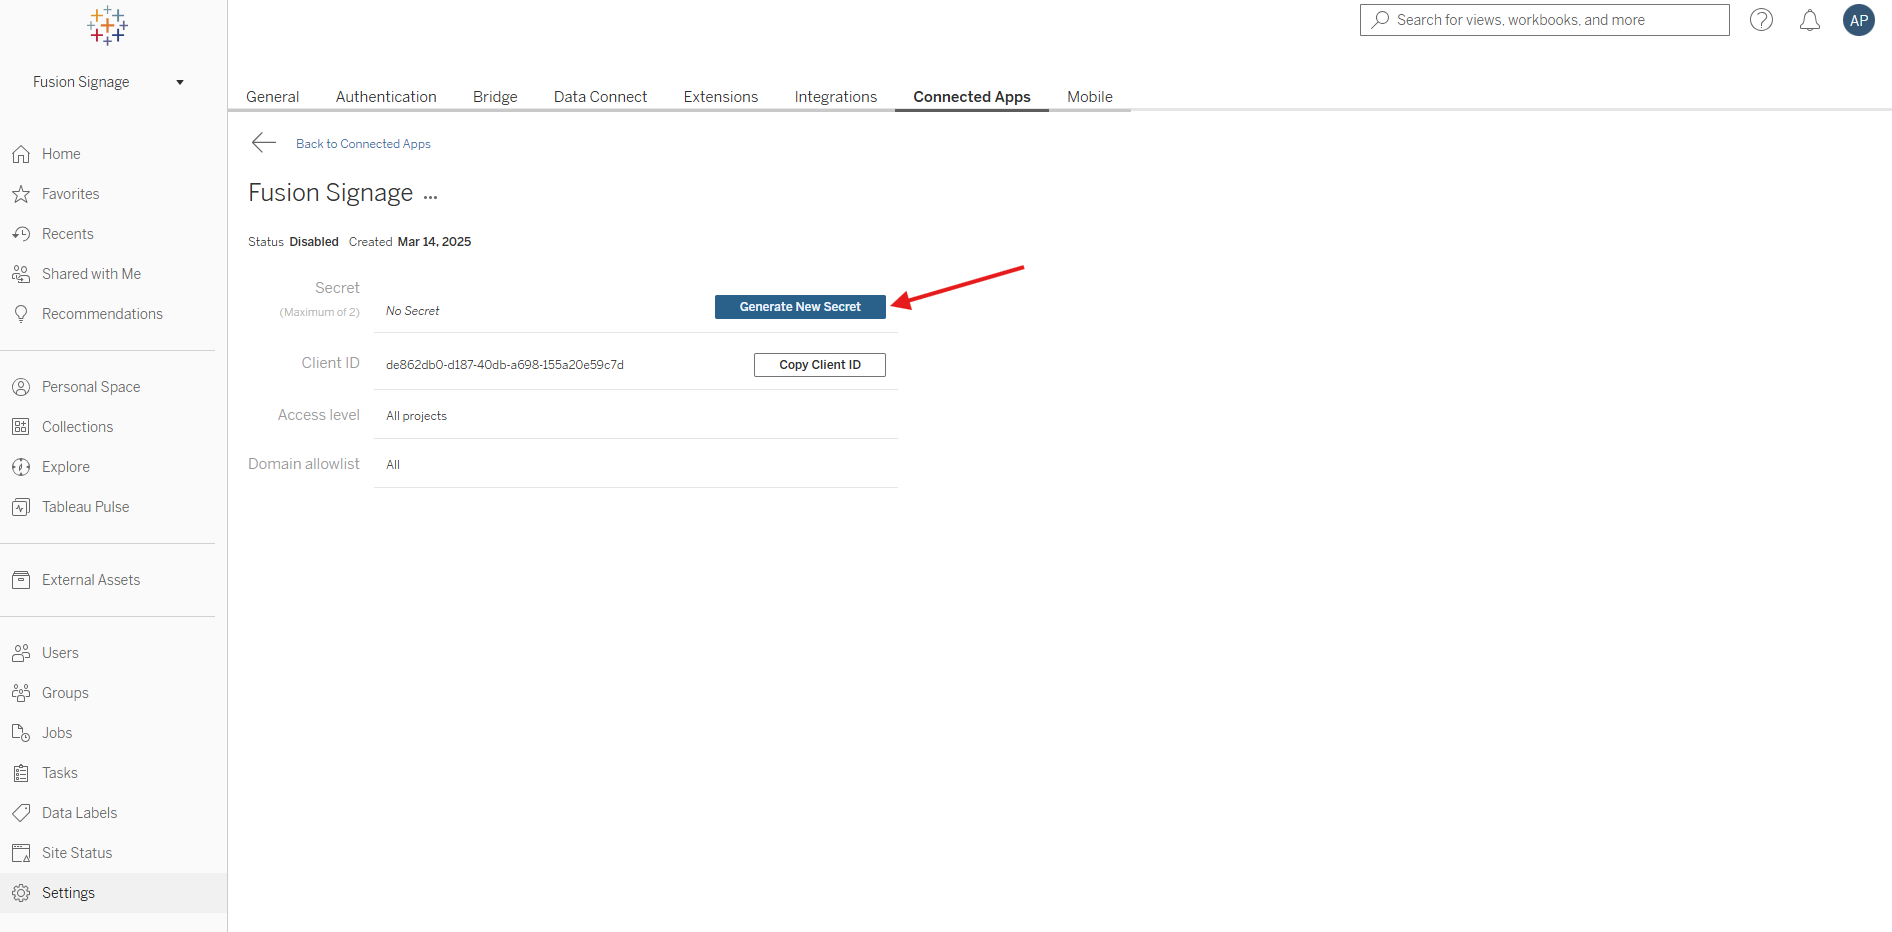
- Take note of the following: Secret ID, Secret Value, Client ID
- Click on the Back button return to the Connected Apps page
- Click the three dots under Actions in the same row as the Fusion Signage connection we just made
- Click Enable
Step 2: Connect Fusion Signage to Tableau
- Log in to your Fusion Signage account
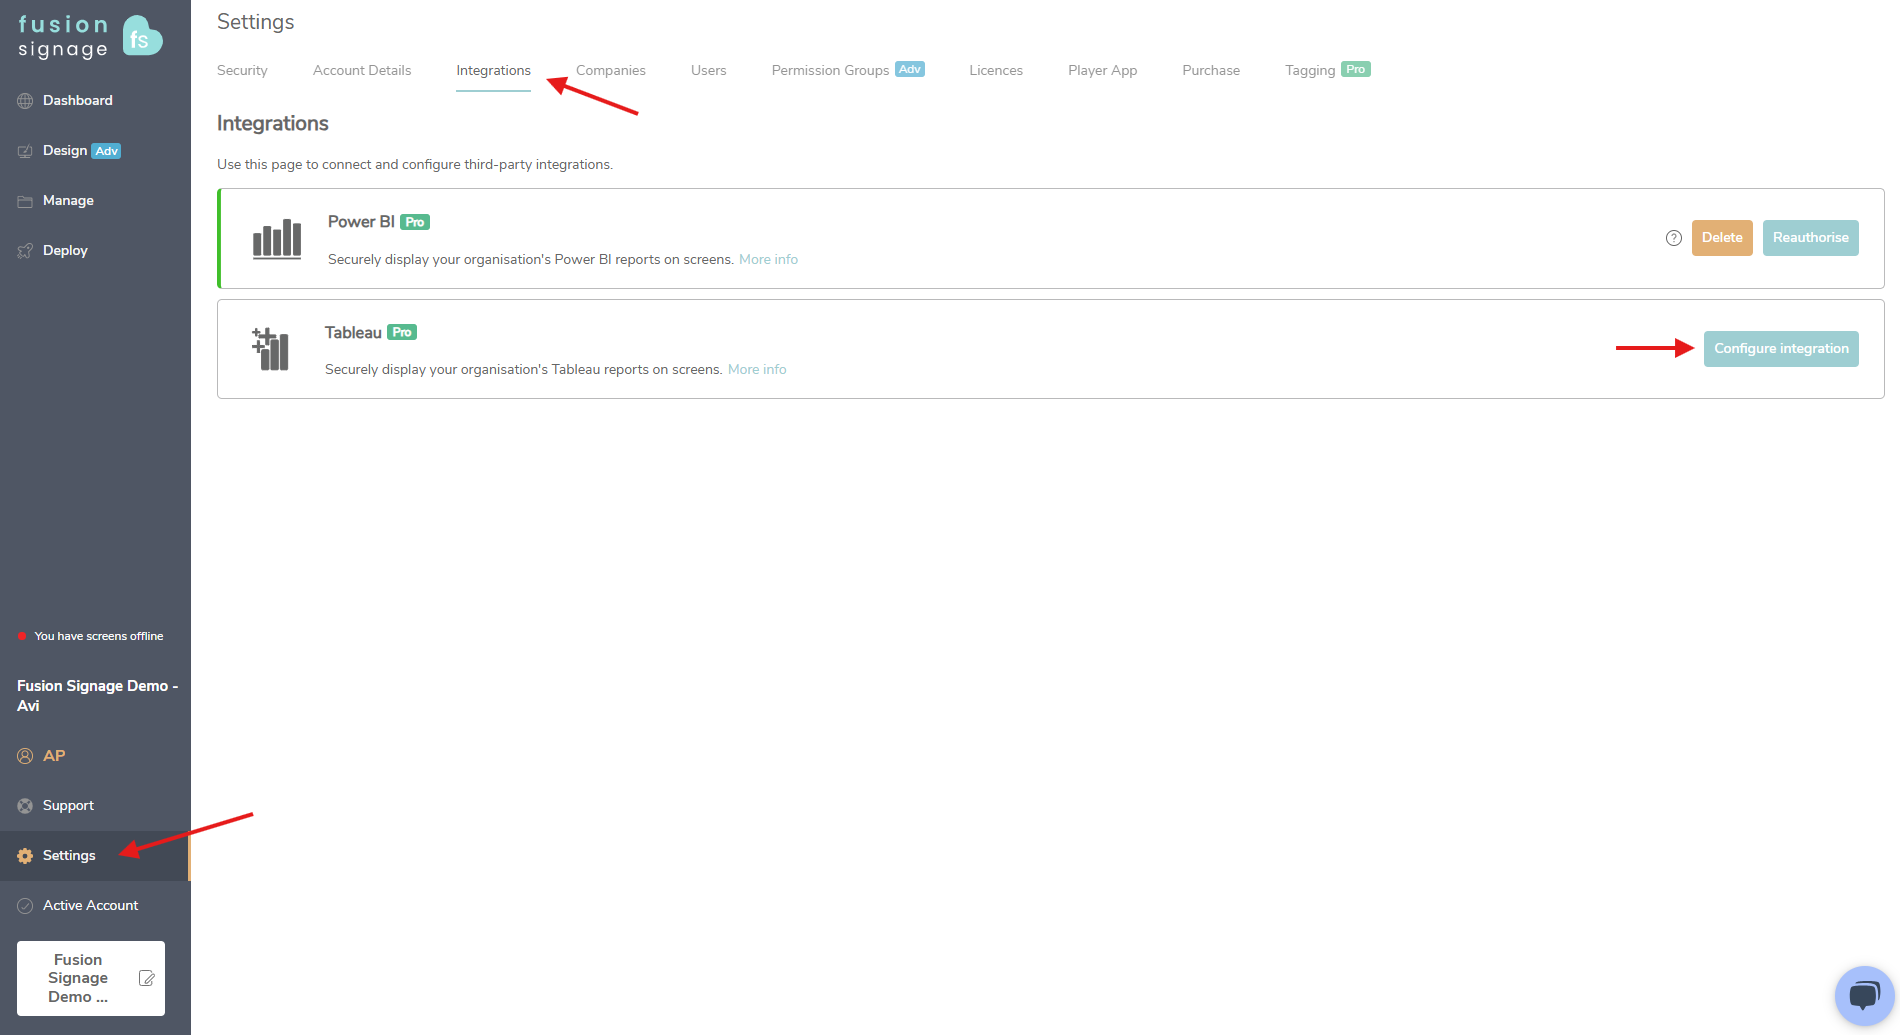
- Navigate to Settings in the main menu
- Click on the Integrations tab and select Tableau
- Click Configure Integration to begin connecting Fusion Signage and Tableau together.
- Fill out Create Tableau Settings
- Login Email Address: This is simply the email you use to log into Tableau
- Site ID: We find this from the URL bar once you log into Tableau.
- Example URL: https://xxx-xxxxxxxxxxx-x.xxxxxx.xxxxxxx.xxx/x/xxx/fusionsignage/xxxx
- Site ID: fusionsignage
- Client ID: From point 10. of Create a Connected App for Fusion Signage
- Secret ID: From point 10. of Create a Connected App for Fusion Signage
- Secret Value: From point 10. of Create a Connected App for Fusion Signage
- Base URL: We also find this from the URL Bar:
- Click Submit
Step 3: Add your Tableau Worksheet into your Fusion Signage account
- Navigate back to the Manage page in Fusion Signage
- Click into the folder where you want to add your projects. You can create a separate folder for these projects if you would like, but this is purely for organisational purposes
- Click Add, then select Tableau
- Choose the Tableau worksheet you want to display from the dropdown
- Select the specific page from the project that you want to show
- Note - you will need to add a new page for each different page you would like to display.
- The project will now appear in your folder
Step 3: Display your project on a screen
- Create a new playlist or edit an existing one
- Click Add, then select Media and find your previously added Tableau project/s
- Apply any tagging or scheduling rules as needed
- Click Publish to send the project to your screen
Filtering Your projects
You can filter your projects to only show relevant information to each specific screen. To do this;
- Navigate to the Deploy page
- Select the Screen Name from the list of devices
- Click Configure Screen
- Click Add under the Tableau Filters section and select the data required for that screen
- You can add as many filters as necessary to ensure only data relevant to that screen or region is showing
- Click Save to apply the filters to the screen
Removing the Integration
- Navigate to Deploy → Integrations
- Click Delete next to the Tableau Integration
- You can also remove the application from your Tableau Connected Apps
FAQs
- What happens if my screen goes offline?
- When a project is deployed to the screen, a screenshot version of the project is cached to the device. This screenshot is updated each time the project refreshes with new data. If your screen loses connectivity, the screen will continue to display the most recently cached screenshot. The screen will not receive any updated data until it is brought back online.